Barn Find
- Matt Pedrick

- Jul 16, 2020
- 3 min read
What a transformation this car received.
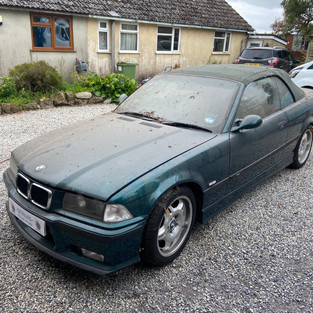
Recently had call from a client in need of some help with his BMW M3. When I arrived I couldn't really believe what I saw, A rare, low mileage and untouched M3 covered in dust, cobwebs and leaves. Not even being opened up for over 6 years.

Not being able to inspect the paint work, mainly because I couldn't see it I choose to look at the interior first, which amazingly didn't have any mould or dust inside. It was exactly the way the customer had left it all those years ago.
Being a rare and one off car this detail had to be perfect as the vehicle was being put up for sale once complete.
Day 1
I started at 8:30 in the morning, got the car out its dusty shed and removed all the leaves and loose dust with compressed air. After this was complete I used my Kranzle pressure washer to remove the main bulk of the dust. This gave me a better surface to start with.
Now basically starting like I would with any car I carried out a safe wash to clean all the surfaces on the car. This made the M3 look loads and showed me how that the paint work was actually in really good condition.
After the safe wash was complete it was time to start the soft top. At 9:30 I pressure washed all the dust and dirt sticking to the roof. This time though I was lucky, as the car had sat inside for so long it had now algae growing on it. only surface dirt which made it fairly easy to clean. I still used the same method to clean it though just to be certain it would be looking its best. Once the roof was completely dry I used Matrix fabric ceramic to protect it.
Once the car was dried it was time to start the interior. deep cleaning the leather and protecting it was the main priority. Using Gtechniq Leather Guard to protect it was the perfect choice. All the carpets were shampooed and all the plastics were deep cleaned and coated for extra protection.
Still on day one and now 3:00pm I started the outside. As the car had been sat for so long it was defiantly going to need clay barring. This removes any dirt and fallout stuck to the paint that the naked eye cannot see. Leaving a slick smooth finish on the paint.
Preparation is key before starting any Paint Correction and protecting any exterior plastic trim is crucial, this is done by using detailing tape, a low tack masking tape to stop glue transferring to the plastics.
Day 2.
Arriving at 8:30 again I got to work straight away with the Paint Correction. Using my Dewalt rotary polisher and Koch Chemie medium cutting compound I slowly worked my around every panel removing swirls and paint defects to leave a glossy deeper shine. After this was complete I swapped machines. Now using my Autobrite Direct Dual Action polisher and a finishing polish I refined and enhanced the paint work to give it that ultimate shine.
The polishing took up the majority of the day but left me with enough time to do the finer details to make this car look 100%. Wheels and tyres, Glass polishing, Engine bay detail, Door shuts and applying a wax coating for protection. I also applied a Gtechniq permanent trim restore to the exterior plastics as they had faded over time.
2 whole days went into to restoring the look of this car and the outcome is amazing. both I and the client are over the moon with the results of this detail.
Heres some photos of the whole job.


Comments